Salesforce is one of the most powerful CRM tools that any non-profit can use to be more successful.
Currently 30,000+ non-profit organizations are using it and 89% of them say Salesforce has helped improve their ability to achieve their mission.
NPOs notice that Salesforce helps them establish and grow donor relationships as well as manage the donation cycle.
Non-profits report that with Salesforce they have +24% more donor retention and + 49% faster response to constituents.
At the same time, they manage to decrease their service and support costs, as well as the cost to raise donations.
In this blog, we’re going to cover how nonprofits use Salesforce Nonprofit success pack to successfully manage all key relationships in their organization and improve their bottom line.
What does SalesForce Nonprofit success pack include?
SalesForce nonProfit success pack standard capabilities includes the following:
- Fundraising
- Communications
- Case management
- Volunteer management
- Reporting
- Relationship management
There are also many ways to customize your package and expand on that functionality by:
- Installing an app from the AppExchange
- Building a customer app you designed yourself
- Using a process builder or a workflow tools to automate some of your work and ensure data consistency
It’s important to remember that SalesForce can’t do everything. So here’s what SalesForce Success pack does not include:
- Payment processor
- Auction management
- email marketing automation
There are options for that in the app exchange but they come with an additional cost.
SalesForce is also not an accounting software. So you need to work with your accountant to check what kind of information she needs.
How to use your Salesforce dashboard
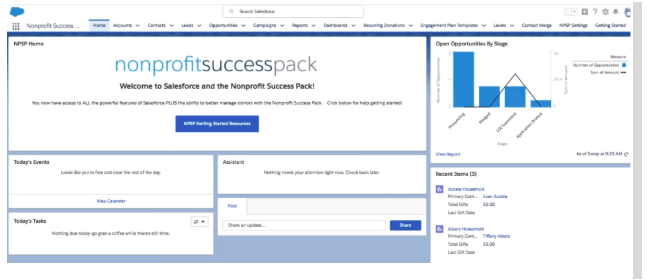
This is how Salesforce Nonprofit success pack looks like when you login for the first time.
This is your homepage. First we see the words nonprofit successpack in the top left cover.
That’s the name of the current app.
If you click on the app on the left, you can select other applications.
On the top you will see a series of tabs across the top, these represent the objects in Salesforce.
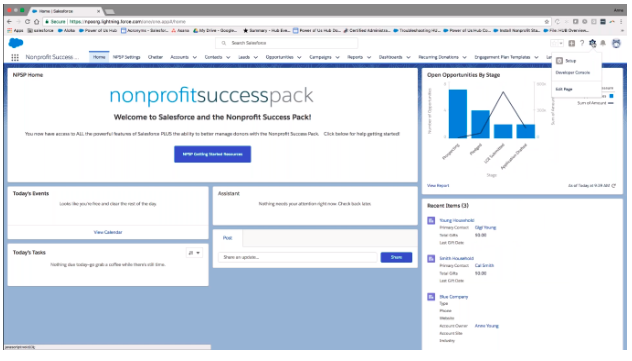
Next we see a large SalesForce Nonprofit success pack in the middle. It will take you to great resources and videos to get started.
Next to that you see a great chart to help you see your fundraising progress.
Next we see some panels to help you manage today’s events and activities. As well as post in chatter.
Chatter is a powerful collaboration tool that helps you connect, collaborate, share files, data and expertise all in real-time.
And last but not least, we see a panel with your listed items. This is based on the record you have created most recently.
Understanding tabs – So tabs represent objects in Salesforce.
You’re probably familiar with Microsoft excel so let’s use it as a comparison.

You’re probably familiar with Microsoft excel so let’s use it as a comparison.
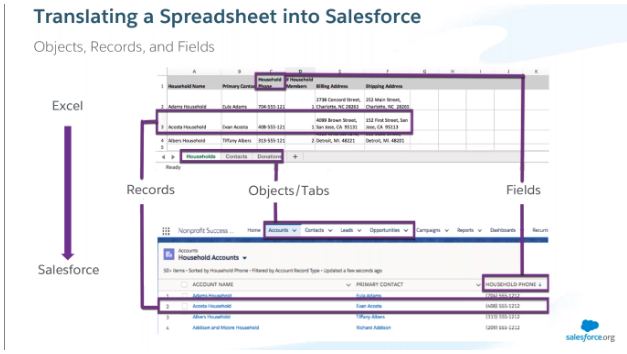
On the top we see the excel terminology – worksheet, column and relevant information.
On the bottom, you can see the same information but shown in a Salesforce window – an object, field and record.
First, let’s show you what we mean by relational database.
An object or a tab is a data table in salesforce database. Think of it as a worksheet in excel.
In this case, we all see the objects each shown different information.
When you drill down each object has a field that hold different type of data – texts, numbers, currencies, formulas, etc.
Think of it like columns in excel.
In the diagram the fields we see are account name, primary contact and household phone.
Last, we have records. Once you setup our object in the fields, we can enter records.
Think of it like the rows in excel.
These are individual entries that hold our data.
Search functionality – on the top there is a global search functionality. This searches all the records in Salesforce.
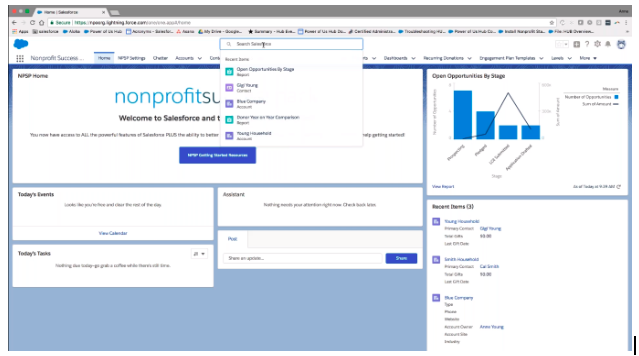
Notice when you click on it, it shows your recent items.
Favorites – Next on the left there is a little star – this is your favorites.

It will set every record that you frequently use as a favorite. So you can easily get to it quickly.
Also, when you’re into any records, you can click the star to add it to your records.
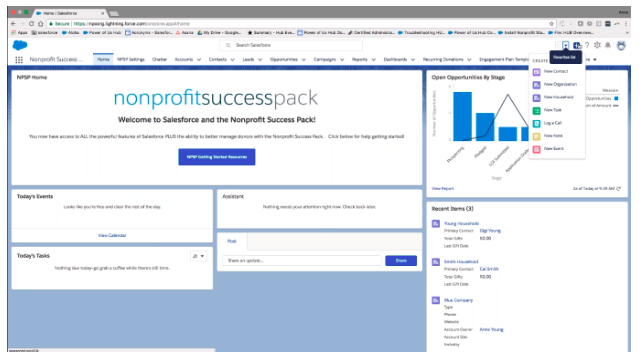
Quick add – this little quick add button quickly creates contacts, households, tasks from anywhere. So if you’re on the fly, you can easily add your data.
Help & training – next the little question mark is what it is – help and training.
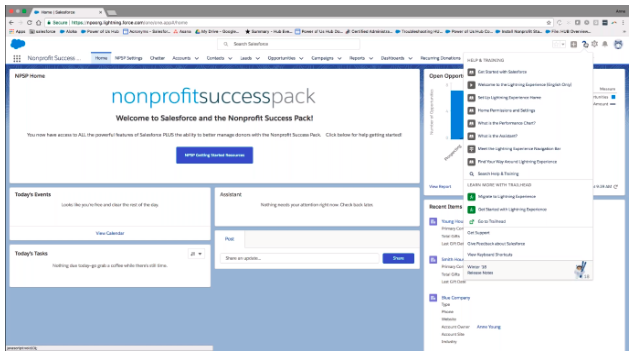
There are lot of helpful resources here – Salesforce help & training, product documentation. Trailhead is a free online learning resource.
Also, from here if you need you can fire a Salesforce support ticket.
Setup – this great icon when you first start with Salesforce, you’re going to hear a lot about the setup menu.
Setup is where the organization admin – this includes managements, permissions, customizing pages layout, customizing fields.
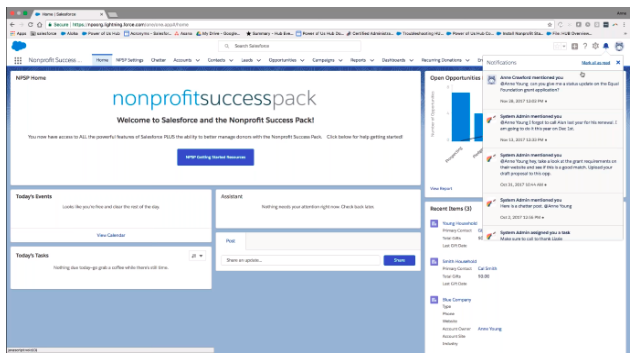
Notifications – next is this bell here that we call Notifications. Here you can see yourself mentioned on recent records.
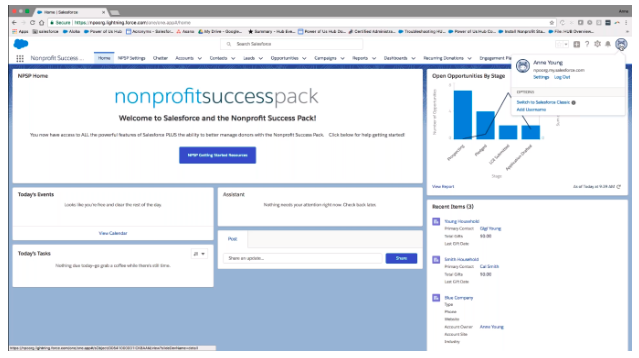
Personal settings – next is your personal settings. You can add your photo here and change your personal settings.
Other apps – Let’s move to this thing that looks like a keypad on a phone.

When you click on this keypad icon and you’re going to see all the apps available to you. Each app hold a different set of tabs that are displayed across the top.
You can also search apps or items. You can also reorder the apps so the ones that you use more often are on the top.
Tabs – Next on the top you see a bunch of tabs – chatter, accounts, contacts, etc.
And each tab represents a different object that we already talked about.

Events and tasks – If you have something loaded in your calendar, you’re going to see it in today’s events and tasks.
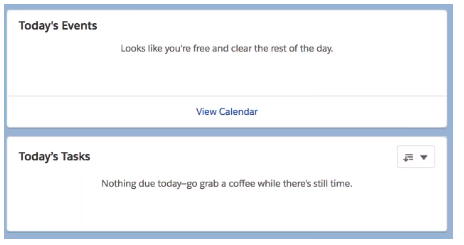
If you have another task setup by yourself or another person, it will be in the tasks section.
Assistant – In the assistant, you’re going to see important updates in the course of your day.
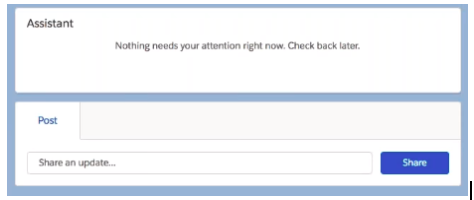
You will see leads that are signed to you, opportunities that need your attention.
Below that is chatter – where you can share an update of what’s going on, mention another user and share a resource or anything that you might want to do.
SalesForce Core Architecture
Salesforce is built as a business-to-business platform.
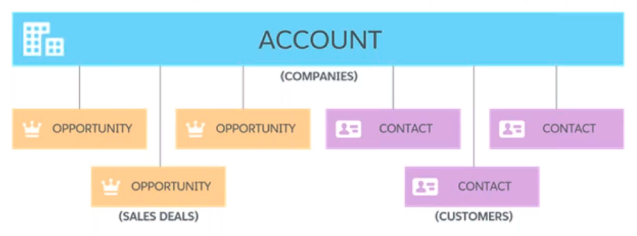
It was originally designed to help businesses sell goods and services to other companies or accounts.
So in standard Salesforce all customers, which we call contacts, and sales deals, which we call opportunities, relate to an account.
There is no direct relationship between individual customer contacts and opportunities for their accounts.
A contact is only as important as someone who is related to a particular account.
Standard Salesforce Objects
These are the standard Salesforce objects that are used by the nonprofit success pack – contacts, accounts, opportunities, activities, campaigns and leads.
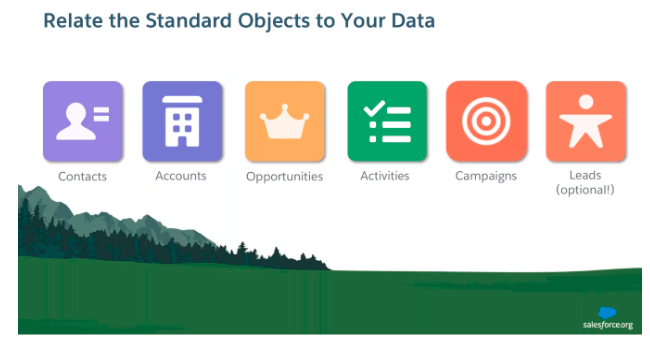
By standard we mean that these objects are included in every instance in Salesforce worldwide.
These are the core objects so it’s important to understand them.
Contacts – these are individual stakeholders in your organization and they must be connected to an account.
As a best practice, we recommend that all contacts are in a household account. But there might be some circumstances when it might make sense for a contact to be in an organization account instead.
Examples of types of contacts – donors, members, volunteers, clients, and partners.
Accounts – these are households, companies or organizations with whom you have a relationship with.
As a non-profit, there are two main type of accounts you can create – households and organizations.
Households – they are used to track donor or member households. A household is a place where one or more people live. A household account is automatically created when you create a contact. Once you create a household, you can additionally add/create other household members.
Organizations – they are used for any other accounts such as funders, corporate donors, schools or other business entities.
Opportunities – these are potential revenue generating activities like donations or grants that you wish to track until they are received or/and closed.
Regardless of how long might take a donation to come in using opportunities is a great way to track stages over time.
Opportunities could include donations from a person or a company, grants from a funder or government institution, memberships from a person or household or sales from merchandise related to your organization.
Activities – they are used to keep track of any communication or action such as meetings, tasks, phone calls, or emails.
Each of these could be stored in SalesForce as activities and related to leads, contacts, accounts, campaigns and opportunities.
Activities are a great way to see who is following up with potential donors and what they talked about on past calls, lunch meetings or in emails.
Salesforce can integrate with your email calendaring systems.
For more on that, see which email integrating product is right for you in help & training.
Campaigns – they are typically used in the non-profit context for annual appeals and other fundraising efforts:
- To track how much money you’ve raised in a particular campaign,
- in direct mailings or email blasts to track who you’re sending information to
- in large event galas and cell amp to track to reserved, attended, spoke, etc.
- in email newsletter to track who you’ve sent a newsletter to and what action they took (did they open it, click it, unsubscribe)
- in advocacy or program outreach to track who you’ve reached out to and what action they took (for example: did they sign your petition)
Leads – they are prospective stakeholders in your organization. They may be interested in your organization but don’t have a deep enough relationship to consider a contact quite yet.
Not all non-profit organizations use leads. But even if you don’t plan to use leads, you should be familiar with them as some email marketing platforms bring in new signups as leads rather than contacts.
Examples of leads include:
- Someone who signed up for an email newsletter but you have no information about them.
- Someone who downloaded a whitepaper from your website
- A community member who came to your monthly friend-raising open house or someone who signed a petition circulated by your organization
There are people out there who you want to get to know better and hopefully convert to a contact.
To use leads or not use leads is one of the first decision you should make when implementing Salesforce.
Some organizations choose to not use leads at all. They simply keep everyone as a contact for simplicity’s sake.
Some of them don’t have a choice because some email marketing solutions require that you use leads. But in any case you should understand the trade-offs.
Nonprofits considering implementing leads may wish to consider the following factors in the decision.
There should be a clear or several clear use cases and you’ll need to establish criteria for converting leads to contacts. Staff will need to be trained to understand the difference between leads and contacts.
Reporting can be more complicated because you’ll need to gather metrics from both leads and contacts.
Lastly, you will need to manage configuration of a more complex business process.
If you’d like to find out what drives the decision of other non-profits, we encourage you to ask and power of US hub and you can search there. There have been lots of conversations about this in the past too.
So feel free to search and read those other conversations in the hub.
NPSP Household account model in action
Now that you know about the standard Salesforce objects and how nonprofits typically use them.
Let’s see how you can use NPSP to manage constituent relationships and households.
At a non-profit a contact can be related to your organization in many ways.
She can be a donor, a volunteer, a participant, a board member, an employee or any combination of those things.
In a non-profit we typically want to be able to track donations from both individuals and organizations.
We also want to look at giving on the individual and household level.
We want to see how a contact is related to their household, their employer or any of the organization that are important to them.
So what you have as non-profit customers is the same as standard salesforce (as any other salesforce customer in the world with the addition of the nonprofit success pack).
NPSP sits on top of the standard Salesforce enterprise edition and helps you manage all of these relationships and make sure donations are attributed to the proper account.
So you see here that we’re using the same objects, accounts, contacts and opportunities but we’re using them in a way that’s more aligned with how nonprofits work.
We recommend that all contacts are in household accounts. By putting your contacts in household accounts you can easily see the ways a contact might be connected to your non-profit.
NPSP affiliations object – Your contacts are connected with many organizations and we want to track that in Salesforce.
For that we’re going to use the NPSP affiliations object.
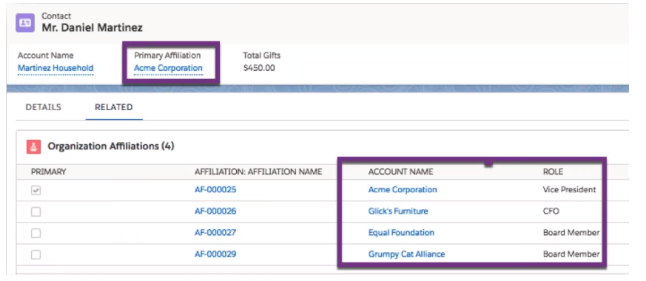
In this example, you can see at glance that our contact Daniel Martinez is connected with several different organizations.
- There is his employer the Acme Corporation. Since Daniel works for them, we’ll designate that affiliation as his primary affiliation
- There is our non-profit The Grumpy Cat Alliance. Here Daniel serves as a board member.
- We also see Glick’s furniture where Daniel used to work
- In the Equal Foundation Daniel served as a board member
Tracking relationships – your contacts are also connected to a lot of other people. NPSP relationships connect one contact to another contact.
Some of these might be friends, board members, or other household members.
We see here that Daniel Martinez has a couple of connections.

We see his relationship to his friend Alma Mahoney who are development officers interested in cultivating as a major donor. Maybe Daniel can make this introduction.
We also see Daniel’s daughter Penelope Martinez who is one of our program participants
The relationship view helps us see all of Daniel’s relationships.
Affiliations vs relationships – so how do you keep affiliations and relationships straight?
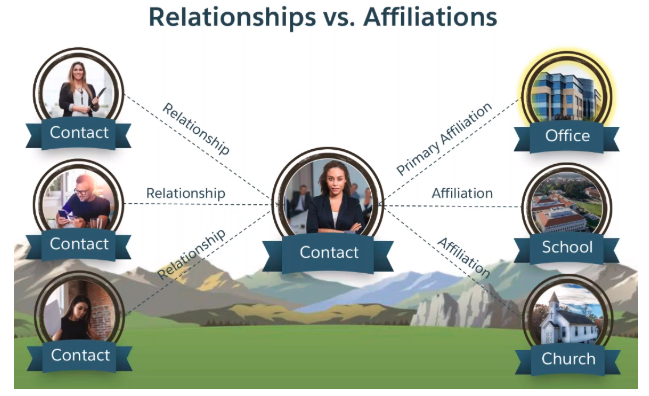
In a nutshell, relationships connect one person to another person. This could be a family relationship, a personal relationship or a business connection.
Affiliations connect to an organization. This could be a business school, Church or any other type of organization.
We can designate one affiliation as a primary affiliation. Generally, we recommend using this to track a contacts employer.
Household with a donation – now that we understand relationships and affiliations, let’s see how this works with donations and grants.
Here’s a basic example of a family that lives in a single household and has made a donation.
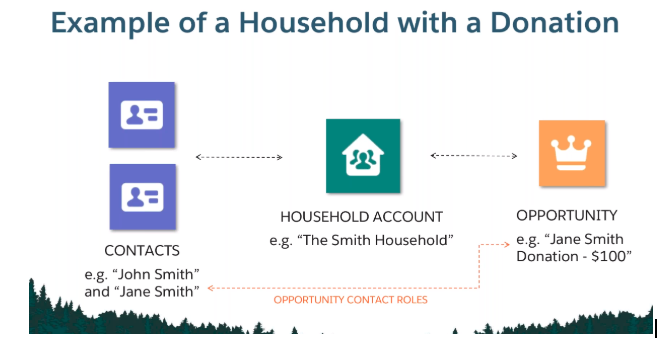
The two contacts in the household are John Smith and Jane Smith. They both belong to the Smith household account.
Jane has made $100 donation to our non-profit which is stored in the opportunity object.
When the donation is created from the Jane Smith contact the opportunity contact role of donor is automatically created.
And the donation is associated with Jane Smith’s contact and Jane Smith’s household account.
By default the NPSP will also give Jane’s spouse John a soft credit for the donation since John is a member of Jane’s household.
This feature is customizable in the NPSP settings.
Here’s some more examples:
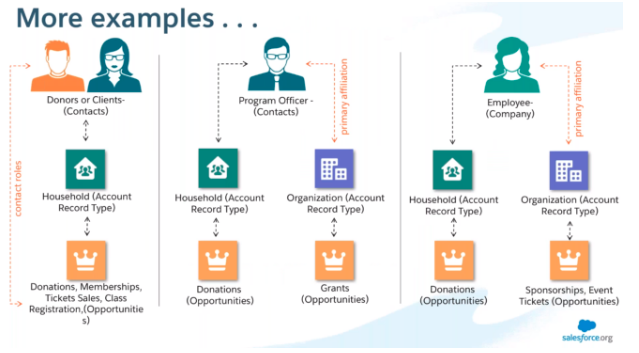
The left example is very similar to the previous one. You have donors or clients associated with a household who purchase a membership or donate to your organization.
In the example in the middle panel, we have a program officer. He is a contact who has his own household but he’s also affiliated with his employer – a foundation.
When you create an account for an organization, such as those who provide grant funding, connect any contacts using affiliations.
The primary affiliation is usually where someone works. You can see that in this example.
The program officer can donate personally to the non-profit organization through his household and also his foundation can provide a grant.
Finally, in the right most example, we have an employee at a corporate sponsor.
Again, this person can donate personally to the nonprofit via his household and their company can also provide sponsorships, event tickets or other benefits.
The employee is affiliated with the company they work for via their primary affiliation on their contact record.
Manage household addresses – the examples we’ve looked at so far show how household accounts can help you manage your personal and organization fundraising.
The household accounts are also vital for keeping of where your contacts live so you can reach out to them for fundraising and event efforts.
The nonprofit success pack helps you keep all of your addresses up to date.

Whether your staff updates the contact’s mailing address or the household’s billing address, NPSP automatically syncs the address across the account and all related contacts.
The most recent address is automatically set as a default address.
You can also set different address for a particular contact by checking the address override box on a contact’s record.
Say if you have a board member who prefers to receive mailings at work as opposed to at home.
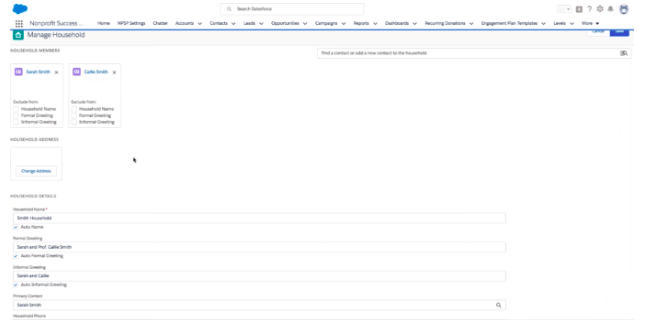
By default NPSP sets the household name formal and informal greetings according to the preferences you set in NPSP settings.
But if the defaults you selected don’t work in a particular cases, you can customize your household name and greetings in the managed household interface.

Adding users – when you setup your trial you created one user out of ten seat licenses.
At this point of your getting started journey, you might want to add a few users from your organization as collaborators.
You can navigate to setup to create new users.
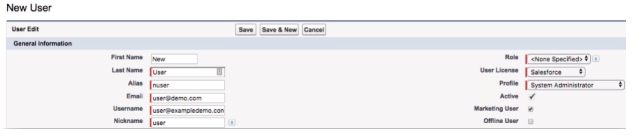
A few key points when you create users:
- For email use the real email address
- Username needs to be in a form of an email address but does not need to be a real email address
- For user license choose Salesforce
- For profile choose system administrator for anyone who you want to make configuration changes to your organization.
- Choose a different profile such as executive management or fundraising and development for others
- Check the marketing user box if you want this user to be able to create campaigns
For more information, see the user management trailhead module.
How to put this into action
The first thing you want to do is create a contact.
One way to do that is to use the plus button that we already talked about.

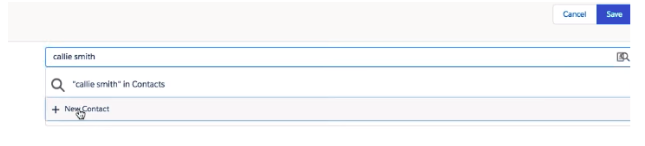
But before we create a contact, you can #hashtag search first.
You want to search to make sure this person isn’t already in your system. That way you will be sure you’re not creating duplicates.
So we’re going to add Sarah Smith. After a search we find that we don’t have a Sarah Smith in our database.
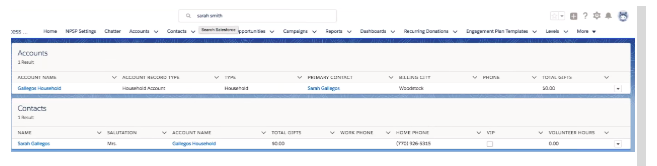
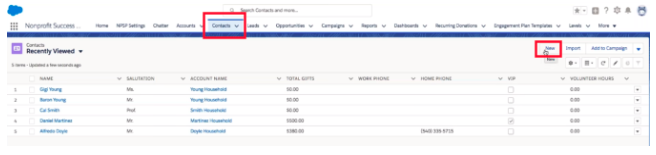
So if you want to enter full contact data, navigate to the contacts tab and click new:
After that, you’re going to see all the fields that you might want to enter.

The last name is the only required field.
So if you just happen to know you’re going to add someone later on and all you have is their last name, go ahead and do that. However, you should try and get as much information as you can just to keep your data nice and clean.
So we’re adding Sarah Smith in here.
We happen to know her email address as well as her mobile number.
Now that you created your contact, take a look at Smith household that was automatically created when you save the contact.
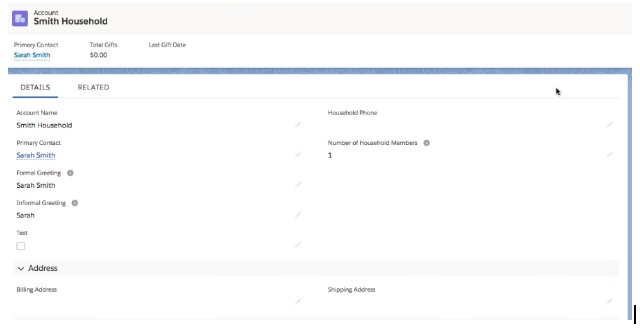
If you want to add another contact to the house, you can click the manage household button.

After we click on the button, we want to add Sarah’s partner Callie Smith.

Other things you can do in the manage household tab is change the household address, phone numbers, customize greetings, etc.
Now we’re going to add Sarah’s employer the Orange company.
To do that first we need to enter the orange company into Salesforce by going to the accounts tab and clicking the button new.

After that you’re going to see the window below. You need to choose an organization.
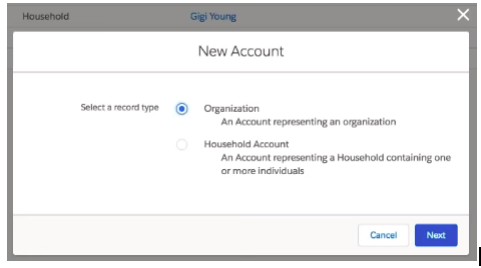
And then you need to fill out all the details about the company:

Be sure to add as much information as possibly can.
As we talked before an organization is any account that is not a househouse – an employer, organization, school, any business you interact with as a non-profit.
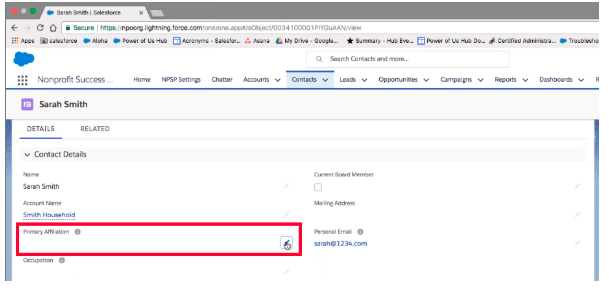
So now that we created the Orange company, we’re going to add to Sarah’s record as her primary affiliation.
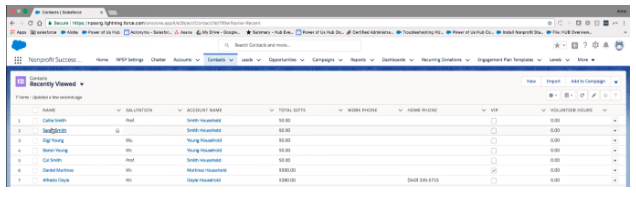
To do that navigate to Sarah’s contact record and go to Contacts and clicking on Sarah Smith.
After that click on the record, scroll to primary affiliation and click on the edit button.
Scroll down to add the primary affiliation.
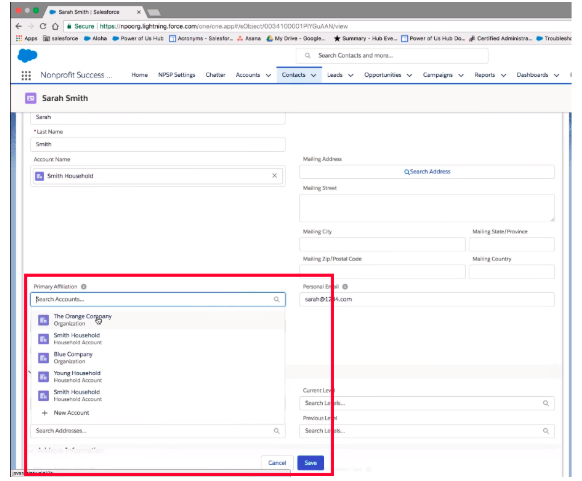
Since we were just adding the Orange company, it’s showing it in the search results.
So you need to click on the orange company and then click save. Now that’s her primary affiliation.
If new need to create new affiliations for her, you can click the new affiliation button on the dropdown list.
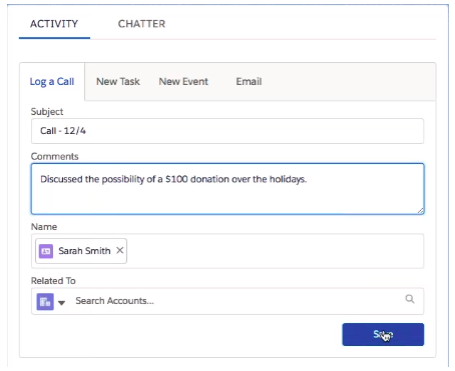
Let’s just say you just got of the phone with Sarah and you talked about the possibility of her and Callie giving a donation.
Let’s log this call.
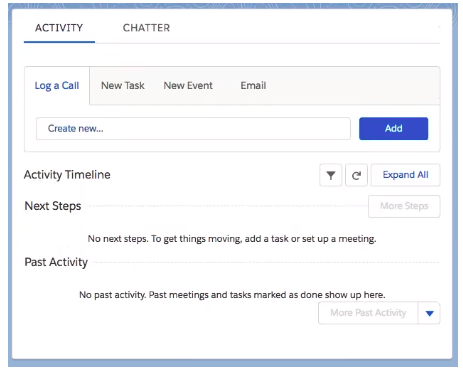
To do that we go to Sarah’s contact and on the right you’re going to see the activity box and inside Log a Call.
It’s good to come up with names that allow you to organize them in a nice clean way.
We’re going to name this call 12/4.
We’re also going to add the comment “discussed the possibility of $100 donation over the holidays”.
And then you want to put any recruitment information that you want for the next time that you talk to.
The next thing that you want to do
Let’s imagine when you were at lunch with your colleague Anne, you had a conversation about the Smiths and about the possibility of them donating.
And you want to be sure that she knows where to find all the information.
That’s why it’s good to chatter Anne Crowford on this record by putting the @ and her name.
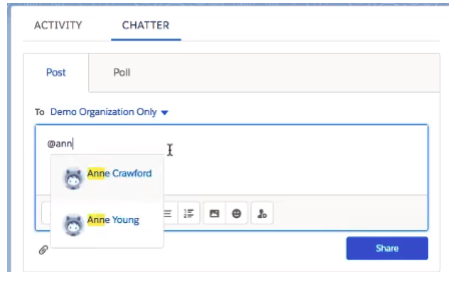
Then you can say the following: “hey, Anne, this is the potential donor we discussed” and then click on share.

And this is going to alert Anne in her Chatter notifications that you want her to take a look at this contact record.
After that she’s alerted, she can follow the record if she wanted to by clicking the plus button and keep track of what’s going on.

Salesforce Nonprofit Success Pack Pricing
NPSP is a Salesforce CRM package created especially for non-profit organization.
It provides tools to help them manage programs, donations, volunteers, and supporters, etc.
Salesforce NPSP has two main plains:
- Lightning Enterprise Edition + Nonprofit Success Pack (NPSP)
- Lightning Unlimited Edition + Nonprofit Success Pack (NPSP)

Lightning Enterprise Edition + Nonprofit Success Pack (NPSP) – it provides you with a complete CRM for nonprofits with a combination with all the features of the Salesforce Enterprise Edition.
It provides you with tools for managing fundraising and nonprofit constituent relationships.
With this package your first 10 EE subscriptions are FREE for qualified customers.
Normally the package costs $150/month but now it is decreased to $36/month as a part of a promotion.
Lightning Unlimited Edition + Nonprofit Success Pack (NPSP) – this gives you the ultimate nonprofit CRM and support.
You have all of the features of Ultimate edition, plus out of the box tools for managing fundraising and nonprofit constituent relationships.
You also get 24/7 toll-free support and unlimited online training.
Normally the package costs $300/month but now it is decreased to $72/month as a part of a promotion.
In Conclusion
Salesforce Nonprofit success pack is a fully functional CRM that allows you add and track contacts, accounts, opportunities, activities, campaigns and leads.
With the NPSP you can also track affiliations which are households or organizations connects to contacts.
You can also use it to track relationships between people and households.
This means that with the power of Salesforce you can connect information between people, organizations and households. This allows you to raise donations more effectively and manage your non-profit more successfully.
You can also use this to add information about how your relationship progresses with your contact and forward it to other people from your non-profit.
That way you can easily understand which contacts are moving down your pipeline and what you need to do to move them on the next stage and turn them into donors.
Need Implementation Assistance?
Book a call with our Salesforce NPSP specialists-Click here.